Building a Custom Router with Proxmox and pfSense: My Journey
When I decided to upgrade my home network, I wanted more control and flexibility than a standard router could offer. Since I already had Proxmox up and running with a few VMs, I thought, why not turn one of my existing computers into a custom-built router using pfSense? With a new dual-port NIC card, I set out to virtualize the whole thing as a Proxmox VM and take full advantage of the setup I already had.
In this post, I’ll walk you through the entire process. I’ll explain how I set up virtual network bridges to keep the Proxmox host and existing VMs connected to the internet, without running into the common networking issues that come with virtualizing a router. From there, I’ll show you how I built and installed the pfSense VM, created a solid network topology, and migrated my VMs over to the new network—(almost) without any downtime.
The best part? I didn’t need to buy any new appliances. I reused one of my existing computers, which not only saved me some money but also gave me the flexibility to tweak my setup however I wanted. This approach is perfect if you’re running a homelab, managing multiple VMs, or just want to have more control over your network. I’ll also cover how I switched my ISP router to bridge mode for better integration and made some final adjustments to get everything running smoothly.
By the end of this guide, you’ll have a virtualized router that fits seamlessly into your existing setup, giving you more control and the ability to expand without limitations. Let’s get started!
The hardware
The main goal of this network migration is to replace the ISP router with a more powerful, customizable solution, turning it into just a bridge. This means the ISP router will no longer handle routing or firewall duties but will instead pass the public IP directly to a new router—in this case, my custom-built pfSense router running as a Proxmox VM.
As part of this process, you might need a few extra pieces of equipment. For example, if you're connecting multiple devices, a switch will be necessary to distribute the network connection across your homelab. You’ll also need a dedicated Access Point (AP) to handle wireless connections, since the ISP router’s Wi-Fi will no longer be in use once it's set to bridge mode.
The computer I repurposed as my pfSense router originally only had a single Ethernet port. Since a router needs at least two network interfaces—one to connect to the internet (WAN) and another for the internal network (LAN)—I needed to add more ports to the system. To solve this, I bought a 1Gbps NIC with two ports, which are pretty easy to find and affordable.
I opted for an Intel NIC because of its reliability and solid driver support in both Proxmox and pfSense. This gave me the additional ports I needed to properly configure my router, allowing it to manage both incoming and outgoing network traffic while providing flexibility for any future network expansion.
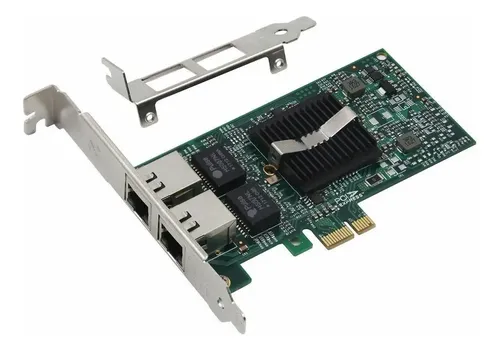
Dual NIC card
Plugging in the NICs
Now, let's dive into the hands-on part of the setup:
Once I installed the new NIC into the computer and booted it up, things didn’t go quite as smoothly as expected. Since I already had Proxmox running on this machine, I assumed it would just pick up the new interfaces and everything would work as usual. But when I turned it on, I quickly realized I couldn't access the internet—or even the Proxmox web UI.
As it turned out, adding the new NIC caused Proxmox to change the names of my network interfaces. My previous interface, enp2s0, became enp3s0, and the two new ports on the Intel NIC showed up as enp2s0f0 and enp2s0f1. This was a bit of a surprise, but not too uncommon when adding new hardware.
To fix this, I needed to update my network configuration. In Proxmox, the network interfaces are configured in files located in /etc/network/interfaces.d. I opened that up and updated the config to reflect the new interface names, making sure the Proxmox host was connected to the correct network interface.
After making the necessary changes, I restarted the networking service with systemctl restart networking, and voilà—everything was back online, with internet access restored and the Proxmox UI working again. I could now see my two new interfaces ready to be used for setting up the pfSense VM.
To see how your network devices are called, run:
ip link show

This is how my node network devices looked like
The proxmox pfSense VM
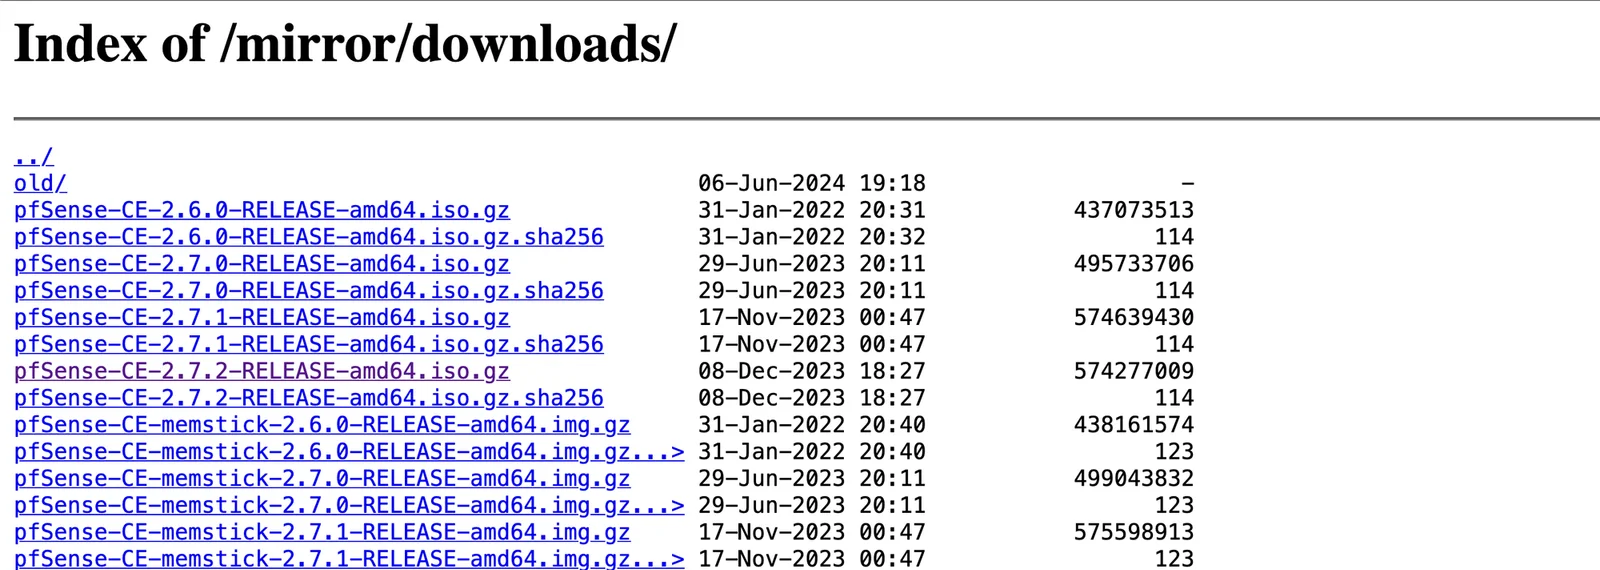
To get started with pfSense on Proxmox, you'll first need to create a virtual machine (VM) and upload the pfSense Community Edition (CE) ISO. The process for downloading the ISO can be a bit tricky since the Netgate website defaults to showing the Plus edition. To simplify your download, here’s a direct link to find the CE ISO: pfSense CE ISO Download.
Steps to Create a Proxmox VM:
- Upload the ISO to Proxmox:
- Log into your Proxmox web interface.
- Navigate to your storage (usually named
localorlocal-lvm). - Click on the "ISO Images" tab and then select "Upload."
- Choose the pfSense CE ISO file you downloaded and start the upload process.
- Create a VM:
- Click on "Create VM" in the top-right corner of the Proxmox interface.
- Fill in the details for your new VM:
- Node: Select the node where you want to create the VM.
- VM ID: This will auto-generate, but you can specify your own if you prefer.
- Name: Give your VM a meaningful name (e.g.,
pfSense).
- Configure the VM Settings:
- OS: Select the uploaded pfSense ISO from the dropdown menu.
- System: Leave the default settings as they are.
- Memory: Allocate 8 GB of memory for the VM.
- Cores: Set 2 cores for the VM to ensure smooth performance.
- CPU: Choose "Host" as the CPU type for faster calculations.
- Network: Do not assign any NIC at this stage.
- Do not start the VM yet.
Networking
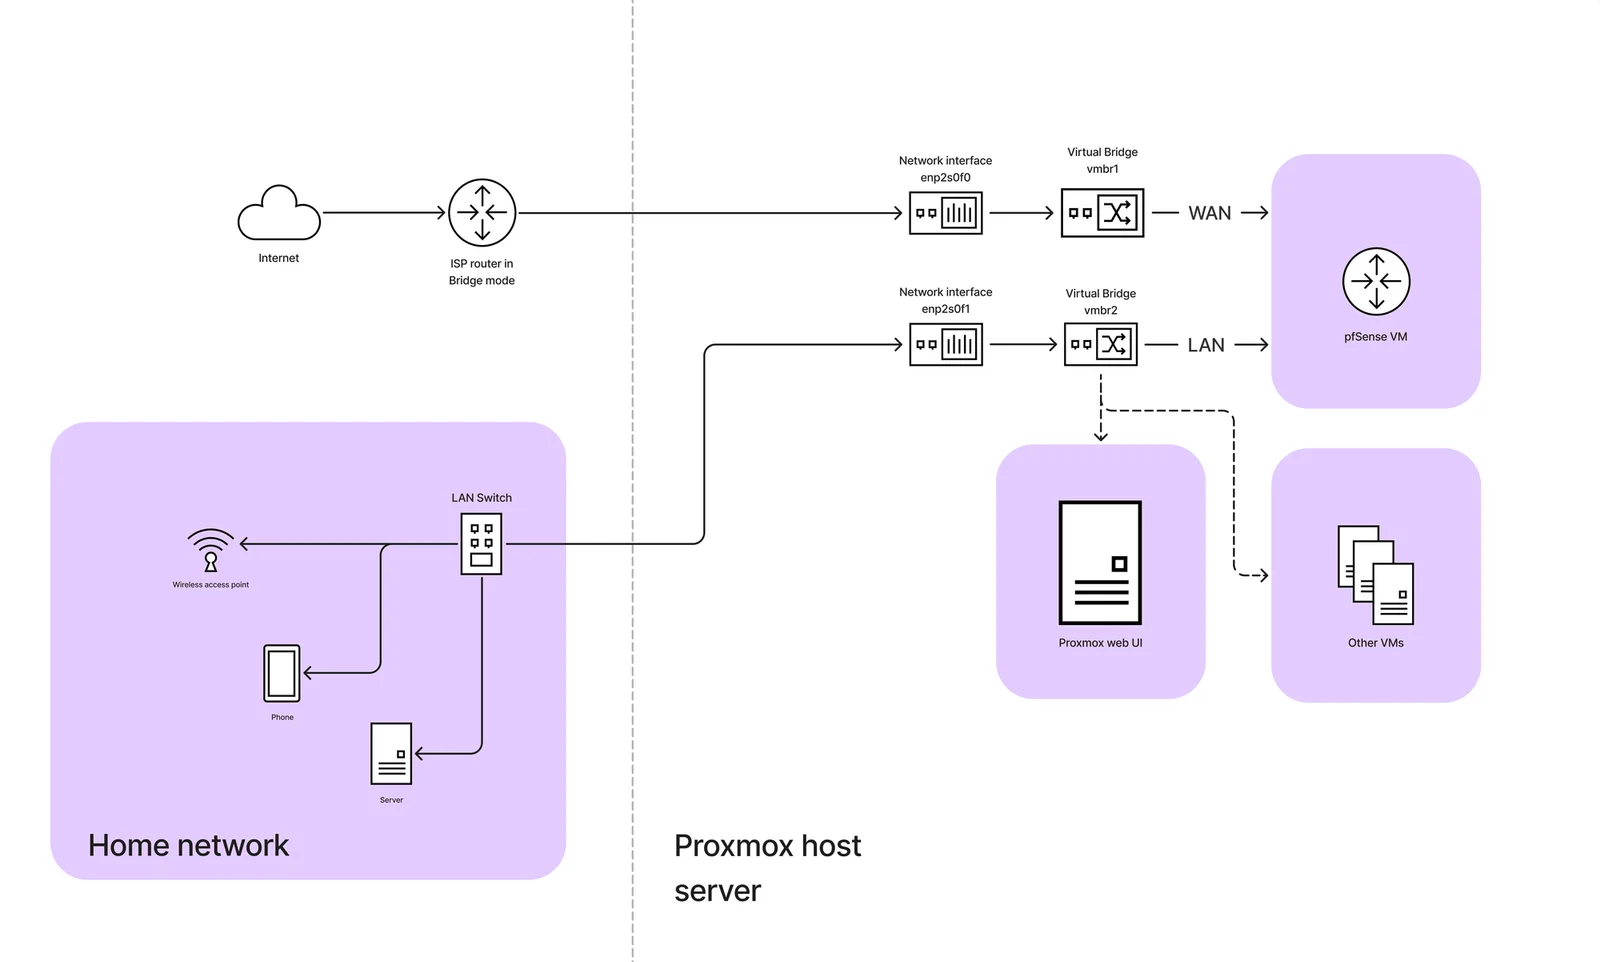
Before making the switch of the router to bridge mode, the network was operating under a double NAT configuration. In this setup, the ISP router played the central role in managing both the internal LAN and the external WAN connection. I used this setup to configure pfsense without losing access to my proxmox web ui.
Here's a breakdown of how the network looked before switching to bridge mode:
Network architecture before switching the ISP router to bridge mode.
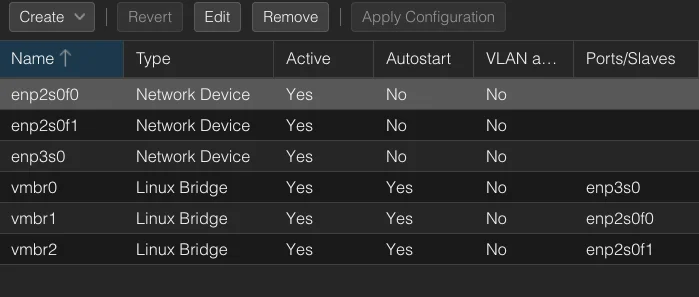
I created the two virtual bridges in my proxmox host (WAN and LAN):
- WAN Interface [vmbr1] (connected to your ISP router): This will act as your WAN (usually NAT’ed initially by the ISP’s modem).
- LAN Interface [vmbr2]: This will be for internal communication and routing traffic to your LAN.
You can think about these bridges as virtual switches in your network.
Initially the proxmox default bridge (vmbr0) holds the gateway IP address for the proxmox web ui subnet. Later on we will make sure that the proxmox is also using the pfSense LAN virtual bridge and subnet.
Virtual bridges in pfSense
Now we can assign the LAN and WAN bridges as network devices to our pfSense VM.
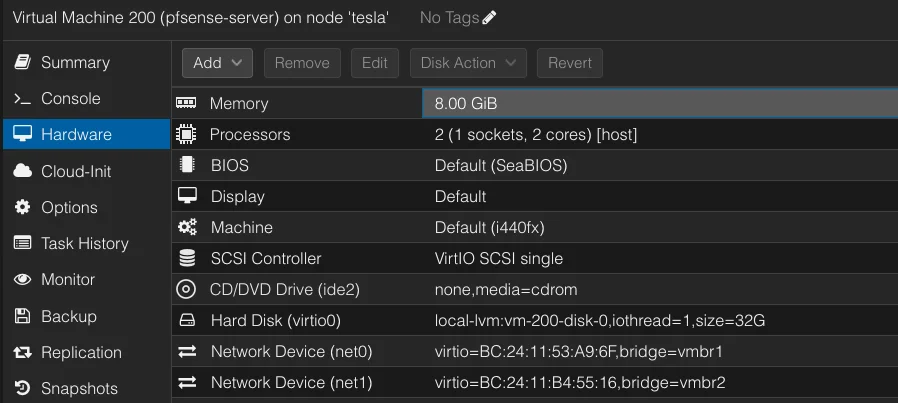
Network devices attached to the pfSense VM
Configure pfSense in Proxmox
- Boot the pfSense VM.
- During pfSense setup, configure the WAN to obtain an IP from your ISP router (via DHCP) or assign a static IP if you prefer.
- For the LAN, assign a different subnet from your ISP router's LAN network to avoid conflicts. For example, if your current network is
192.168.1.0/24, you could set the pfSense LAN as10.20.0.0/24.
To avoid conflicts and ensure smooth operation, it's better to have the pfSense LAN in a different network range (e.g., 10.20.0.x), with the Proxmox host either on the current network or migrated to the new pfSense LAN after you switch the modem to bridge mode.
If you set up pfSense's LAN in the same subnet as your existing router (e.g., 192.168.1.x), you’ll end up with double NAT. Double NAT creates complications for routing traffic and port forwarding because two devices (your router and pfSense) are both trying to manage NAT for the same network.
Enable Access to the Proxmox UI
You need to ensure that your Proxmox host can be accessed from both networks (the current network, before the ISP modem is switched to bridge mode, and the pfSense network):
- Proxmox Management Interface: Keep Proxmox’s IP on the existing network for now so that you can still access it via the router while pfSense is being set up.
- pfSense LAN Configuration: Ensure that you configure firewall rules in pfSense to allow access to the Proxmox web UI once it’s running on the pfSense LAN network.
- Go to the Firewall Rules section in pfSense, and under the LAN tab, create a rule to allow traffic from the LAN network to Proxmox’s static IP address.
- Restart may be needed
TIP: Make sure everything auto starts and change your PC bios config to auto boot on power.
And, create a new password for your pfSense instance to make sure you are secure!!!
Enable your Proxmox server to use your new LAN subnet
When transitioning your network to a pfSense-controlled LAN, one critical step is ensuring that your Proxmox Web UI moves from the old LAN (managed by your ISP router) to the new LAN subnet created by pfSense. This way, you can still access Proxmox’s management interface once your ISP router is in bridge mode, with pfSense fully taking over routing duties. You may also need to move some of your VMs to the new LAN.
You need to ensure that Proxmox receives an IP address in the same subnet as the LAN managed by pfSense (e.g., 10.20.0.x).
- Edit Proxmox’s Management Network Interface:
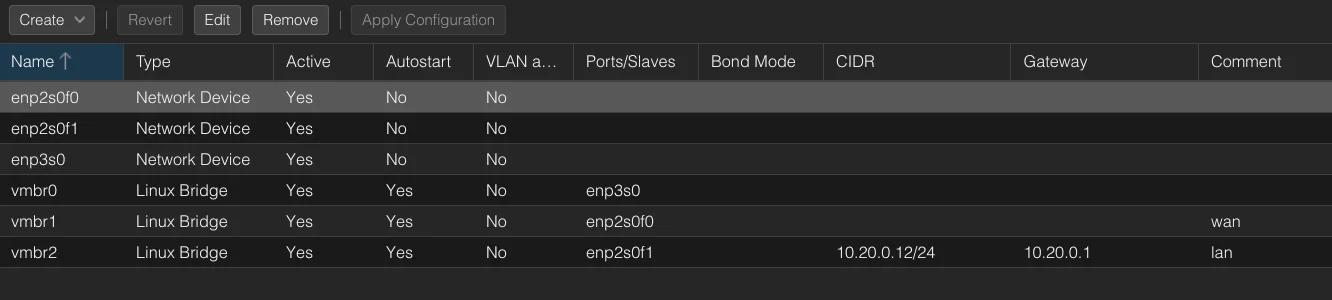
- Still in Proxmox’s Network Settings, find the current management bridge (likely
vmbr0), which has an IP address from your old ISP router’s subnet (e.g.,192.168.1.x). - Change the Bridge to the new virtual bridge you created for pfSense’s LAN (e.g.,
vmbr2). - Assign a new static IP to Proxmox in the pfSense LAN subnet (e.g.,
10.20.0.10). This IP must be outside the DHCP range managed by pfSense to avoid conflicts. - Set the gateway IP to the pfSense LAN interface (e.g.,
10.20.0.1).
- Still in Proxmox’s Network Settings, find the current management bridge (likely
- Update DNS and Gateway Settings:
- Ensure that Proxmox is using pfSense as its gateway and DNS server. This way, Proxmox can resolve internal and external names, and its traffic will be routed through pfSense.
- Save the Changes and apply the network configuration. If prompted to reboot the node or restart the networking service, do so to ensure the changes take effect.
Remove the Ethernet cable from ISP modem to the proxmox web ui, you now have an extra ethernet interface.
I also at this moment connected a switch with my Access point to the pfSense LAN physical port (make sure you disable the DHCP in your access point).
Switch ISP Modem to Bridge Mode
Once you confirm pfSense is properly routing and you can access the Proxmox web UI from the new pfSense LAN, you can switch your ISP modem/router to bridge mode.
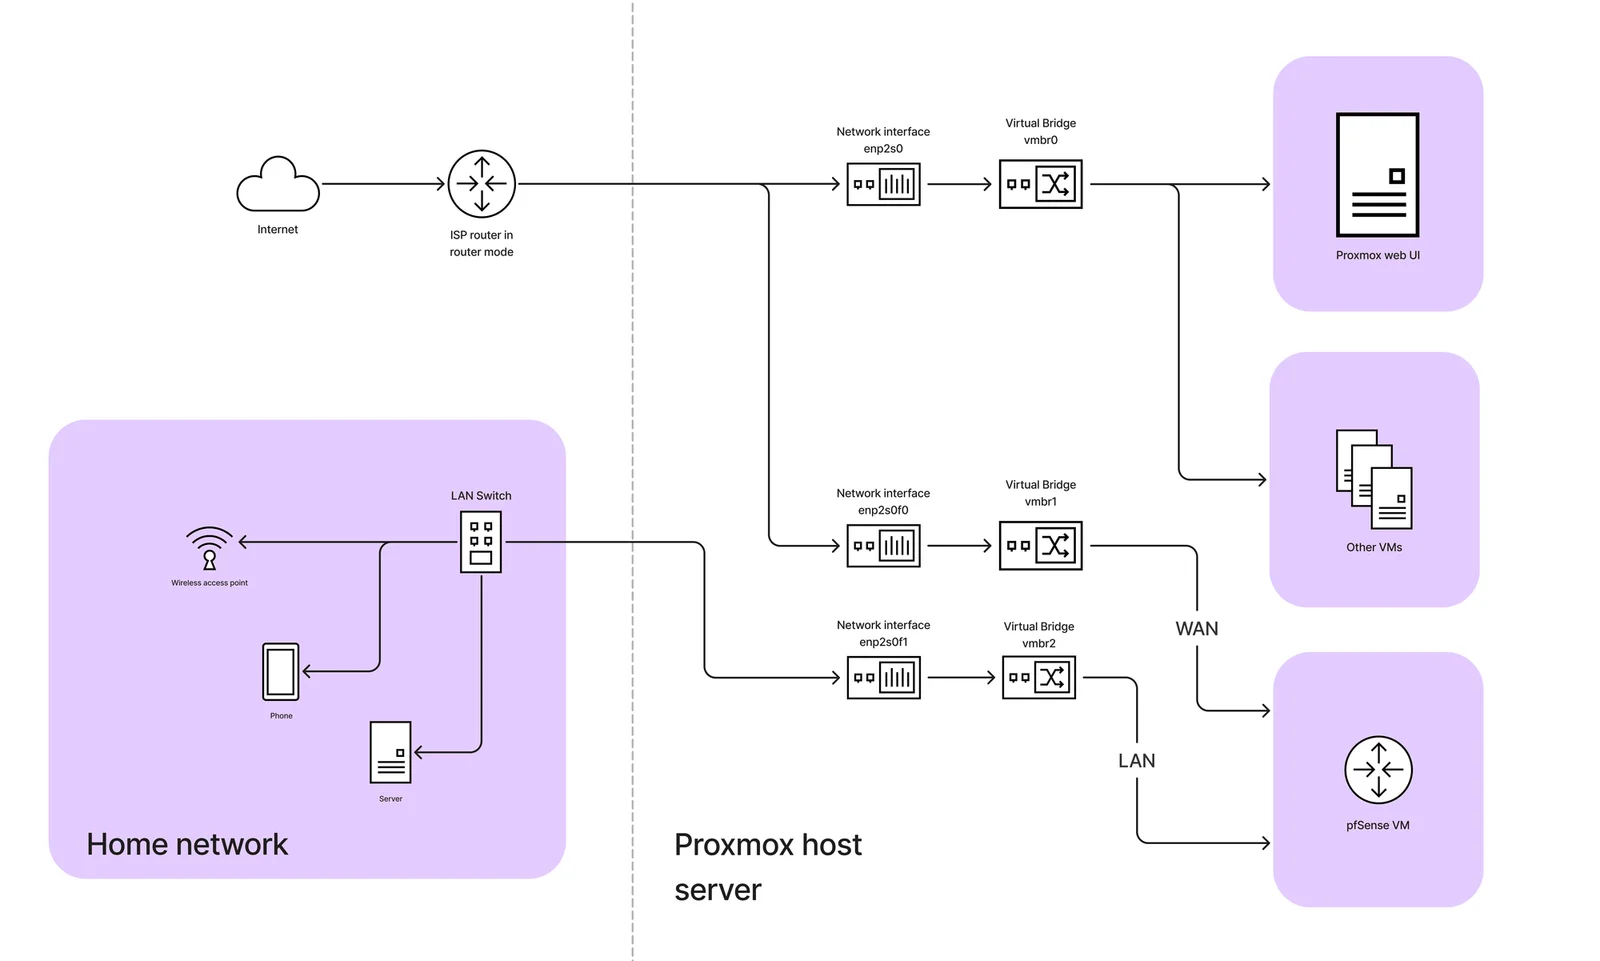
When I switched the ISP router to bridge mode, the network architecture underwent a significant change. In this new configuration, the ISP router ceased to function as a router and simply passed the public IP from my ISP directly to my pfSense firewall running on a virtual machine in Proxmox.

Network architecture after switching the ISP router to bridge mode.
After switching to bridge mode, your pfSense WAN interface should automatically receive a public IP from your ISP.
In my scenario my ISP connection works via PPoE. If that's also your case, go to go to Interfaces > WAN in pfSense and set IPv4 Configuration Type to PPoE and set your ISP username and password.
If it doesn’t happen automatically, go to Interfaces > WAN in pfSense and check the settings or manually request a new IP.
Final Adjustments
Just ensure that Proxmox and other LAN devices have their network interfaces pointing to the pfSense LAN gateway.
Finally, review your pfSense firewall rules and routing to make sure everything behaves as expected. Play around with pfSense - it's fun!!!
The end (or not)
With everything in place, the transformation of my (and maybe yours too) network is complete! After navigating through IP configurations, virtual bridges, and the nuances of pfSense, my homelab setup has taken a huge step forward. The days of being limited by my ISP router are over—pfSense is now handling all routing duties with precision and flexibility.
The journey had its challenges (bridges turned out to be more crucial than expected), but the payoff has been worth it. My network is now faster, more secure, and fully under my control. With Proxmox comfortably integrated into the pfSense-managed LAN, managing my virtual machines and network setup is smoother than ever.
Whether you’re working on your own homelab or simply exploring the possibilities of virtualization and custom routing, this combination of Proxmox and pfSense is a game-changer. The new setup has opened up a world of possibilities, and I’m excited to continue exploring what’s next! 🚀